Mahesh Medical
Examination gloves are designed to create a temporary barrier between skin, contaminants, and potentially infectious materials. That barrier can fail through tiny tears, weak seams, sharp fingernails, jewelry, or rough handling. The risk is easy to underestimate. A glove may look clean while a pinhole allows moisture to reach the skin.
The FDA’s Medical Glove Guidance explains that disposable examination gloves are commonly evaluated using an acceptable quality limit, often AQL 2.5 for pinhole defects. This is a production-quality measure, not a promise that every glove is defect-free. The World Health Organization also emphasizes that gloves do not replace hand hygiene. Dr. Didier Pittet, a leading infection-prevention expert, has repeatedly stated, “Gloves do not replace hand hygiene.” That reminder matters after removing damaged gloves.
This article explains how to check for punctures in examination gloves before and during use. Look closely at fingertips, thumb joints, palm creases, and the area near the cuff. Stretching the glove gently can reveal thinning, split seams, or small openings. Do not rely on appearance alone. A glove that feels unusually loose, sticky, wet, or brittle deserves replacement.
A simple water-leak check may help during controlled quality inspections, but it should follow workplace procedures and manufacturer instructions. It is not a substitute for certified laboratory testing. In daily practice, some checks will be imperfect. Lighting may be poor. Fatigue may reduce attention. That is why trained staff should inspect gloves before contact, change them immediately after suspected damage, and perform hand hygiene every time.
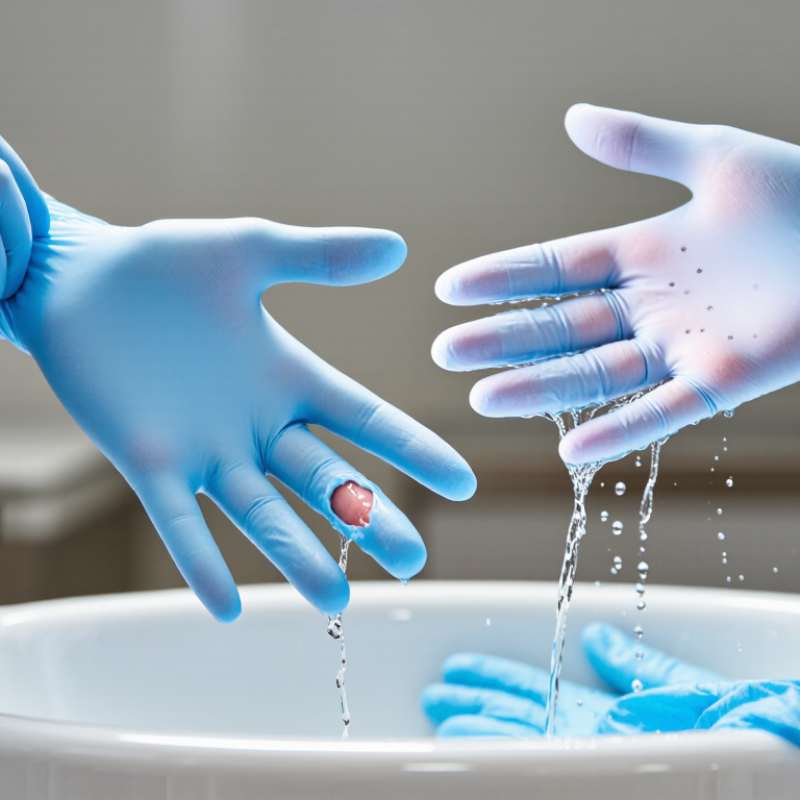
A tiny puncture can break the glove’s protective barrier. It may expose hands to blood, body fluids, chemicals, or contaminated surfaces. It can also transfer microorganisms between a healthcare worker, a patient, and nearby equipment. The damage is often difficult to see. A thin split may appear only when the glove stretches during movement.
Puncture detection matters because safe glove use depends on barrier integrity. A quick glance helps, but it is not enough. Inspect both gloves before use, especially around fingertips, thumbs, seams, and cuffs. Look for tears, unusual thinning, sticky areas, or visible holes.
During longer procedures, check for looseness or sudden wetness inside the glove. If damage is suspected, stop safely, remove the gloves, perform hand hygiene, and replace them according to workplace procedures. No inspection method catches every defect. That limitation deserves honest attention.
Tips: Store gloves away from heat, sunlight, moisture, and sharp objects. Select the correct size, since excessive stretching can increase stress on weak areas. Avoid pulling hard on the cuffs. Use only approved leak-testing methods when a closer inspection is required. A water test may not suit every glove or setting, so follow facility guidance. Document recurring defects and review storage or handling practices. Small details matter.
Check examination gloves before touching a patient, specimen, medication, or contaminated surface. Hold each glove under bright light, then inspect the fingertips, thumb, palm, and spaces between fingers. These areas stretch most during gripping. A tiny split may look like a shiny line. It can also appear after opening the package, not before.
Check again during extended procedures. Sweat, friction, sharp packaging edges, and repeated contact can weaken latex, nitrile, or vinyl. Replace gloves immediately after visible damage, fluid leakage, or contact with a contaminated surface. Never rinse and reuse disposable gloves. The Centers for Disease Control and Prevention recommends changing gloves between patients and during care when contamination occurs. Small details matter.
Published healthcare studies summarized in the American Journal of Infection Control have reported glove perforation rates ranging from about 3% to over 60%, depending on the task and testing method. These figures mainly concern clinical procedures, not every examination glove. That distinction is easy to miss.
ASTM D5151 also provides a standardized water-leak test for detecting glove holes, but routine users still need visual checks.
In practice, inspection often becomes rushed. I have seen teams check only the palms, which leaves the fingertips forgotten. That habit needs review.
Glove inspection starts before the box reaches the treatment area. Check the package seal, expiry date, and glove size. Then examine each glove under bright, even light. Look for tears, thin patches, embedded particles, and open cuffs.
Inflate one glove gently with air, when local procedure permits, and watch for escaping air. Do not stretch aggressively. Stretching can create damage rather than reveal it. Small holes matter.
During use, pause after contact with needles, rough instruments, wire edges, or contaminated surfaces. Inspect fingertips, thumb webs, and palms, where friction and tension are highest.
If a glove feels wet inside, slips, or loses shape, treat it as compromised. Remove it safely, perform hand hygiene, and replace it.
Never wash disposable examination gloves for reuse.
Do not rush.
OSHA estimates that 5.6 million U.S. workers may face occupational bloodborne-pathogen exposure. This explains why barrier checks deserve attention. FDA guidance uses an acceptable quality limit of 2.5 for examination gloves.
However, AQL describes batch sampling, not every individual glove. ASTM D5151 provides a standardized water-leak test for detecting holes.
Standards support quality control, but they cannot replace observation during care. I have still missed tiny defects under poor lighting. That is the uncomfortable lesson.
A quick glance is not an inspection. Use a clean surface, slow down, and report repeated defects through the facility’s quality process.
Tiny glove defects may not appear during a quick visual check. They can look like small pinpricks near the fingertips, thumb, or cuff. A 2020 systematic review in the Journal of Hospital Infection reported widely varying surgical glove perforation rates, from about 2% to over 60%. Procedure type and detection method strongly affected the results.
Visual inspection is useful, but limited. Hold each glove under bright, angled light. Stretch the material gently without tearing it. Then check for thinning, bubbles, sticky areas, and irregular seams. Do not rely on touch alone. A pinhole can leak without feeling different.
Water testing is more reliable for sampling. ASTM D5151 describes filling a glove with approximately 1,000 milliliters of water and observing it for two minutes. Look for droplets forming below the glove. EN 455-1 also uses water-leak testing, with quality sampling commonly linked to an AQL of 1.5. This is a sampling limit, not proof that every glove is defect-free.
Air inflation can reveal slow leaks when water is unavailable. Inflate the glove slightly, seal the cuff, and watch for pressure loss. Avoid excessive inflation. It may create damage that was not present. I would record the batch, test method, time, and failed location. That small detail matters. Testing is practical, but never perfect. A negative result means “not detected,” not “impossible.”
A punctured examination glove changes the situation immediately. Stop the procedure when safe. Keep the contaminated hand away from clean surfaces. Remove the glove carefully, turning it inside out. Perform hand hygiene, then put on a new pair. Do not rinse or reuse the damaged glove. CDC guidance states that gloves must be changed when torn, punctured, or visibly contaminated. It also stresses that gloves never replace hand hygiene.
Check the exposed skin for cuts, redness, or fluid contact. If exposure occurred, report it promptly through the facility’s occupational health process. Follow the site’s exposure assessment and documentation procedure. CDC has estimated about 385,000 sharps injuries among hospital workers in the United States each year. A glove puncture is not a sharps injury, but it can remove an important barrier during a high-risk moment. Inspect the instrument, packaging, and work area before continuing. Record when the puncture occurred and what caused it. These details can reveal repeated problems, such as rough instrument edges or rushed glove changes. No inspection method is perfect. A quick glance can miss a pinhole. In practice, slower removal and immediate replacement may prevent a small defect from becoming a larger exposure. Sizing also matters. A tight glove may split at the fingertips, while a loose glove can catch on equipment. Follow the facility’s approved glove selection and incident-response procedures.
| Inspection Dimension | Why It Matters | How to Check | What Indicates a Problem | Action After Finding a Puncture |
|---|---|---|---|---|
| Glove condition before use | A damaged glove may no longer provide an effective barrier against biological fluids, chemicals, or surface contamination. | Inspect the packaging, expiration information, glove surface, fingertips, palm, and cuff in good lighting before donning. | Visible holes, tears, thin areas, brittleness, discoloration, stickiness, or damaged packaging. | Do not use the glove. Dispose of it according to the facility’s waste procedure and select a new glove. |
| Visual inspection after donning | Some defects become easier to see when the glove is stretched over the hand. | Spread and flex the fingers gently; examine the fingertips, finger webs, thumb, palm, and wrist area. | A split seam, stretched hole, exposed skin, unusual air movement, or fluid reaching the skin. | Stop the task when safe, remove the glove, perform hand hygiene, and replace it with a new glove. |
| Leak testing for reusable examination gloves | A leak test can identify small defects that are not obvious during a visual inspection. | Follow the glove manufacturer’s validated procedure, such as controlled inflation or water testing, where reusable gloves are permitted. | Air loss, water leakage, bubbles, or moisture appearing through the glove material. | Remove the glove from service immediately. Do not repair or continue using it unless an approved validated repair process exists. |
| Inspection during a procedure | Punctures can occur from sharp instruments, broken glass, fingernails, rough surfaces, or excessive stretching. | Monitor for sudden wetness, visible blood or fluid inside the glove, loss of fit, or a change in tactile sensation. | A torn fingertip, visible contamination inside the glove, or direct skin exposure. | Change gloves as soon as possible. If a sharps injury occurred, follow the exposure and injury reporting procedure immediately. |
| Potential exposure to blood or body fluids | A puncture may expose broken skin, mucous membranes, or an existing wound to infectious material. | Check whether fluid contacted the hands, cuts, dermatitis, eyes, mouth, or other mucous membranes. | Wetness inside the glove, blood or body fluid on the skin, or a needlestick or cut occurring at the same time. | Wash skin with soap and water; flush eyes or mucous membranes with water; report promptly for occupational health assessment. |
| Chemical contact | A puncture can defeat glove protection, while glove compatibility also depends on the specific chemical and exposure conditions. | Review the product safety information and glove compatibility guidance before use; inspect for swelling, softening, cracking, or degradation. | Chemical odor inside the glove, irritation, discoloration, swelling, cracking, or liquid contact with skin. | Remove contaminated gloves safely, rinse or wash the affected area as directed by the safety information, and seek medical advice when required. |
| Hand hygiene after glove removal | Gloves may have microscopic defects or may become contaminated during removal; gloves do not replace hand hygiene. | Remove gloves without touching the contaminated outer surface with bare skin, then clean hands immediately. | Visible contamination, a suspected leak, or contact between the contaminated glove exterior and bare hands. | Wash with soap and water when hands are visibly soiled; otherwise use an appropriate alcohol-based hand sanitizer when suitable. |
| Incident documentation | Recording defects helps identify recurring problems with storage, handling, fit, procedures, or supply quality. | Record the date, task, glove type and size, defect location, suspected cause, exposure details, and immediate actions according to local policy. | Repeated punctures, defects from the same lot, injuries, or contamination events. | Notify the supervisor or safety representative and retain the glove or packaging only if permitted by the investigation procedure. |
| Prevention and replacement | Correct glove selection, storage, and timely replacement reduce barrier failures. | Use the correct size and material, store gloves in a cool dry place away from sunlight and chemicals, and replace gloves between tasks when indicated. | Frequent tearing, poor fit, degradation from storage, or repeated failure during the same task. | Review the task risk assessment, improve handling practices, and select a more suitable glove type or size in accordance with workplace guidance. |
Check the seal, expiry date, package damage, and glove size. A loose seal is a warning.
Use bright, even light and a clean surface. Look for tears, thin patches, particles, bubbles, sticky areas, and open cuffs. Check fingertips, thumb webs, palms, and seams carefully.
Yes, when local procedures permit it. Inflate the glove slightly, seal the cuff, and watch for pressure loss. Do not overinflate. Excess pressure may create damage.
No. A pinhole may leak without feeling different. Water testing can support sampling by filling a glove and watching for droplets. A negative result means “not detected,” not “impossible.”
Pause after contact with needles, rough instruments, wire edges, or contaminated surfaces. Inspect after friction or sudden stretching. Do not rush.
Treat the glove as compromised if it feels wet inside, slips, loses shape, or shows visible damage. Tight gloves may split at the fingertips. Loose gloves may catch on equipment.
Stop the procedure when safe and keep the contaminated hand away from clean surfaces. Remove the glove carefully, turning it inside out. Perform hand hygiene and replace it immediately.
No. Do not wash or reuse damaged or disposable gloves. Replacement is safer than trying to restore the barrier. Gloves never replace hand hygiene.
Record the batch, test method, time, defect location, and possible cause. Note rough equipment, poor lighting, or rushed changes. My quick checks have missed tiny defects. That remains an uncomfortable limitation.
Puncture detection is essential because even a tiny hole in an examination glove can reduce protection and allow contact with fluids, contaminants, or irritants. Knowing how to check for punctures in examination gloves helps maintain a safer working environment for both the wearer and the person being examined. Gloves should be checked before use, after being put on, and whenever they may have contacted sharp edges, excessive friction, or harsh substances. Careful attention is especially important around the fingertips, thumb, palm, and areas that stretch during movement.
Begin by inspecting the glove under good lighting for tears, thin spots, discoloration, or unusual stretching. Gently flexing the fingers and palm may reveal weak areas. For a closer check, a glove can be lightly filled with air or water, provided the procedure is suitable for the workplace, then observed for leaks. Never rely on a damaged glove. Remove it safely, wash or sanitize hands as appropriate, replace it with a new glove, and report repeated defects through the proper workplace process.
